Organizing a surgical instrument trolley is more than arranging clamps by size. It supports sterile technique, surgical flow, and safer decision-making under pressure. The practical question is simple: How to organize surgical instrument trolleys efficiently without creating unnecessary movement or confusion? A reliable system begins with the procedure card, surgeon preference list, and verified instrument count. Place frequently used items within easy reach. Keep delicate, heavy, and sharp instruments separated. Labeling should remain visible when the trolley is covered.
Professional guidance supports this disciplined approach. The World Health Organization’s 2009 multicentre surgical safety study reported major complications falling from 11.0% to 7.0% after checklist implementation. Inpatient deaths also decreased from 1.5% to 0.8%. These findings do not prove that trolley layout alone prevents harm. They show the value of standardized preparation, communication, and verification. The CDC’s Guideline for Disinfection and Sterilization stresses thorough cleaning before disinfection or sterilization. It also requires attention to manufacturer instructions.
A well-organized trolley should mirror the operation’s actual sequence. Place opening instruments together, followed by exposure, dissection, hemostasis, closure, and specialty items. Keep backup instruments clearly identified, rather than mixing them into the main field. Count instruments at documented checkpoints. Confirm packaging integrity, sterilization indicators, and instrument function before use. Small details matter.
Still, no layout is perfect. Staff height, room design, surgeon preference, and emergency changes can disrupt an ideal plan. Teams should audit near misses, misplaced instruments, and unused items. A monthly review may reveal that a “standard” setup wastes space or increases reaching. Practical improvement comes from observation, validated policy, and honest reflection—not from attractive arrangements alone.
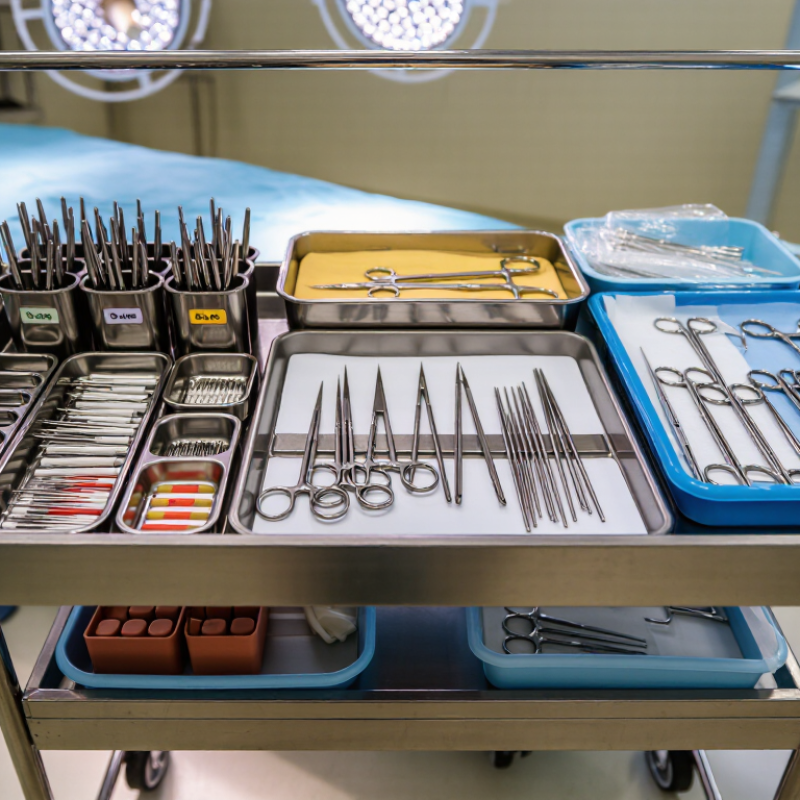
A trolley should match the operation, not merely the room. Start by listing the procedure, instrument sets, accessories, and expected case duration. For each case, estimate tray weight and the space needed for sterile handling. Heavy sets may require stronger shelves and safer positioning. Frequently used items should remain within easy reach. Less common instruments can sit lower or on a separate trolley.
Observe the workflow before choosing a layout. Can a scrub nurse identify every item quickly? Does the trolley fit beside the operating table without blocking staff movement? Check wheel stability, handle height, shelf clearance, and cleaning access. Surfaces should tolerate approved cleaning methods, while enclosed sections may protect instruments during transport. Requirements must also reflect facility policies and surgical-site infection controls. Ask sterile processing staff for practical input. They often notice risks that a catalogue does not show.
Our first trolley arrangement looked efficient on paper, but the upper tray became crowded during a busy procedure. It was not ideal. That experience showed why real-case observation matters. Record missing items, unused instruments, awkward reaches, and repeated trolley movements after each operation. A simple review can reveal whether the trolley is too large, too small, or poorly divided. Leave room for necessary variations, but avoid adding instruments “just in case.” Extra weight increases handling effort and can hide critical items. Requirements should be reviewed periodically, especially after procedure changes, staffing changes, or updated cleaning guidance.
Create clear zones for each instrument category before loading the trolley. A practical layout may include separate areas for cutting, grasping, retracting, and specialty instruments. Keep frequently used items near the front edge. Place heavier trays on lower shelves to improve stability. Small accessories should remain in labeled containers, not loose on the trolley.
From hands-on theatre setup, consistent zones reduce searching and unnecessary handling. Use readable labels and a simple visual system approved by your facility. Keep sharp instruments protected and separated from delicate items. Check counts against the procedure list before the trolley leaves the preparation area. Sterile packaging must remain intact, dry, and within the required storage conditions. Always follow local policy and validated processing instructions.
Our first layout looked organized but slowed access during busy procedures. We had grouped instruments by shape, not by use. That mistake was useful. After staff feedback, we moved common instruments closer together and reduced duplicate labels. Review the arrangement after each procedure type changes. A zone that works for one team may frustrate another. Ask staff to test the trolley during a realistic setup, then record what caused delays or confusion. Small adjustments often improve safety more than a complete redesign.
A well-organized surgical instrument trolley should reflect the procedure, not personal habit. Place instruments in the sequence they are normally used. Keep frequently handled items within the scrub person’s easiest reach. Store less-used instruments at the rear or on a lower level. Separate cutting, grasping, retracting, and suturing tools with clear visual spacing. This arrangement reduces searching during critical moments.
The World Health Organization’s Surgical Safety Checklist study reported major complications falling from 11.0% to 7.0% after checklist implementation. Instrument layout supports the same discipline. A trolley for abdominal surgery might place scalpels, forceps, and scissors in the upper working zone. Retractors and specialty tools can remain grouped below.
Use a simple count sheet for every procedure. The Joint Commission identifies retained surgical items as a preventable safety risk, making accurate counts essential.
Small details matter. Label shelves by procedure and frequency. Mark missing or damaged instruments immediately. Do not assume yesterday’s layout still works. Staff changes, new techniques, and emergency cases can expose weak points. A brief review after each operation can reveal awkward reaches or unnecessary movements. Some teams may over-organize the trolley and slow access. That mistake deserves honest discussion. The best layout is tested at the operating table, then adjusted with documented feedback.
Top Tips to Organize Surgical Instrument Trolleys
Sterile handling begins before instruments reach the trolley. Perform hand hygiene, wear appropriate protective equipment, and check the trolley surface for dust, moisture, or damage. Clean the trolley according to approved facility procedures, then allow it to dry completely. A damp surface can compromise careful preparation.
Keep sterile packs separated from unprocessed or visibly contaminated items. Inspect every package for torn seals, punctures, moisture, or expired indicators. Do not use questionable packs. Place heavier sets on lower shelves to improve stability, while keeping frequently needed instruments easy to reach. Avoid overloading the trolley. Crowding encourages contact and makes inspection difficult.
Identification should remain clear throughout transfer and use. Match each tray with its procedure name, contents list, sterilization date, and tracking information. Use readable labels that stay attached during handling. Confirm instrument counts against the approved list, especially for small clamps, needles, and detachable parts. A second person should verify critical information when possible. Small details matter.
Even experienced teams miss simple issues. A neat trolley is not automatically a safe trolley. Staff should pause when a label is unclear or a package feels unusual. Follow validated reprocessing instructions, local policy, and applicable clinical standards. Document discrepancies promptly, review recurring errors, and adjust the trolley layout when evidence supports a change. Habits can become invisible. Checking them cannot.
| Organization Dimension | Recommended Practice | Sterile Handling Requirement | Identification Method | Inspection Timing | Acceptance Criteria |
|---|---|---|---|---|---|
| Trolley zoning | Divide the trolley into defined zones for sterile sets, supplementary instruments, consumables, and documentation. | Keep sterile items physically separated from used, unprocessed, or waste materials. | Use clearly printed zone labels and a consistent left-to-right or top-to-bottom layout. | Before each procedure | Every item is in its assigned zone with no cross-contamination risk. |
| Weight distribution | Place heavier instrument containers and dense items on lower shelves; keep frequently used lighter items within easy reach. | Do not stack items in a way that can crush sterile packaging or obstruct inspection. | Mark shelf load limits and use shelf labels for item categories. | Daily and after restocking | Trolley remains stable, mobile, and free from overloaded or obstructed shelves. |
| Sterile pack placement | Position sterile packs with labels visible and place them so wrappers are not folded, compressed, or exposed to sharp edges. | Handle packs with clean, dry hands and avoid touching the sterile barrier unnecessarily. | Display pack name, sterilization date or load reference, and expiry information where applicable. | Before use | Packaging is dry, intact, sealed, and legible; no punctures, tears, or compromised seals. |
| Instrument set grouping | Group instruments by procedure and sequence of use, such as cutting, grasping, retracting, suturing, and specialty items. | Open sets only in the designated sterile field and maintain aseptic technique during transfer. | Use standardized set names, count sheets, and set identification labels. | During preparation and close-out | Set contents match the approved count sheet and procedure requirement. |
| Sharps control | Keep needles, blades, and other sharps in a dedicated secure container or protected location. | Use a neutral zone or approved transfer method; never leave exposed sharps loose on the trolley. | Label the sharps area with a visible warning symbol and disposal instructions. | Continuously during use | Sharps are accounted for, protected, and disposed of in an approved container. |
| Identification and traceability | Use one consistent identification system for set name, contents, processing status, and destination procedure. | Do not use an item if its processing status or sterile-barrier information cannot be verified. | Record set identifier, sterilization load or batch reference, inspection status, and responsible staff member. | Before release and before use | Labels are readable, match the records, and support one-step traceability. |
| Instrument condition | Arrange instruments so hinges, box locks, insulation, tips, and cutting edges can be checked without unnecessary handling. | Remove damaged, wet, visibly soiled, or improperly processed instruments from service. | Apply a documented defect tag or electronic status record for items requiring repair or reprocessing. | Before each procedure and after use | Instruments are clean, dry, functional, intact, and suitable for the intended procedure. |
| Environmental separation | Keep the trolley away from sinks, splash zones, unnecessary traffic, and unprocessed items while awaiting use. | Maintain covered or protected storage according to local sterile storage procedures. | Use status signage such as “Clean,” “Sterile,” “In Use,” or “For Reprocessing.” | Before movement and storage | Trolley status is immediately recognizable and protected from avoidable environmental exposure. |
| Cleaning and disinfection | Clean and disinfect trolley surfaces using products and contact times approved by the facility. | Complete cleaning before loading sterile supplies and after any contamination event. | Maintain a cleaning log with date, time, staff initials, and any corrective action. | At least daily and after contamination | Surfaces are visibly clean, dry, intact, and free from residue or debris. |
| Final count and handover | Perform a structured final check against the procedure card before the trolley enters the operating area. | Use aseptic transfer practices and avoid opening sterile packs until the sterile field is ready. | Document the completed count, exceptions, corrective actions, and handover personnel. | Immediately before handover | Contents, labels, sterile status, and required documentation are complete and verified. |
Top Tips to Organize Surgical Instrument Trolleys
A trolley should support safe flow, not create searching time. Review it before every list and after every procedure. Check drawer labels, instrument counts, sterile packaging, and expiry dates. Confirm that frequently used items remain easy to reach. The WHO Global Report on Infection Prevention and Control (2022) states that about 7 in 100 acute-care patients in high-income countries acquire at least one healthcare-associated infection. This makes routine control more than a storage task.
Tips: Use a signed checklist for each review. Restock according to the next scheduled procedure, not habit. Keep heavier instruments low, and separate clean supplies from used or questionable items. Inspect wrappers for moisture, tears, or broken seals. Remove damaged items immediately. Do not guess.
Maintenance needs a visible record. Staff should clean trolley surfaces according to local policy, inspect castors and drawers, and report loose handles or sharp edges. AAMI ST79 emphasizes documented sterilization practices, staff competency, and traceability. Those principles also support trolley control. The CDC Guideline for Disinfection and Sterilization (2008, updated online) stresses that reusable devices require cleaning before disinfection or sterilization. A trolley cannot correct poor reprocessing.
Tips: Match every instrument to the approved procedure list. Record shortages before they delay care. Review near-misses during team briefings. A rushed count is not a reliable count. I have found that “fully stocked” can still mean poorly arranged. Review the layout with theatre staff, then change one drawer at a time.
Regular review, restocking, and maintenance help keep surgical instruments available, sterile, and ready for use.
Use this checklist at the defined control points: review the trolley before each procedure, restock immediately after use, and complete cleaning and maintenance checks according to the facility’s daily and scheduled preventive-maintenance procedures. Local policies and sterile-processing requirements should always take priority.
List the procedure, instrument sets, accessories, and expected duration. Choose shelf space for sterile handling. Heavy sets need stronger shelves and safer positioning.
Keep commonly handled instruments within the scrub person’s easiest reach. Place less-used tools lower or farther back. This reduces searching during critical moments.
Arrange instruments in their usual sequence of use. Separate cutting, grasping, retracting, and suturing tools visually. Clear spacing helps staff identify items quickly.
Check wheel stability, handle height, shelf clearance, and cleaning access. The trolley should fit beside the operating table. It must not block staff movement.
Place heavier instrument sets on lower shelves. Avoid overloading the trolley. Extra weight increases handling effort and may hide critical items.
Inspect the surface for dust, moisture, or damage. Clean it using approved facility procedures. Let it dry completely.
Match each tray with its procedure name, contents list, sterilization date, and tracking details. Use labels that remain readable during handling. Unclear labels deserve a pause.
Record missing items, unused instruments, awkward reaches, and repeated movements. Review the trolley after each operation. Our first arrangement looked efficient, but the upper tray became crowded. Real-case observation exposed the problem.
How to organize surgical instrument trolleys efficiently begins with assessing the needs of each procedure, including the instruments required, available space, and expected frequency of use. Create clearly defined zones for different categories, such as cutting, grasping, retracting, suturing, and specialty instruments. Group items according to the procedure they support, while placing frequently used tools in the most accessible positions. This arrangement helps reduce unnecessary movement and supports a smoother, more consistent workflow.
Sterile handling and clear identification are also essential. Use appropriate protective practices, keep instruments separated from nonsterile supplies, and label sections or containers so staff can quickly locate the correct item. After each use, review the trolley, remove damaged or misplaced instruments, restock missing supplies, and confirm that all equipment is clean and ready for the next procedure. Regular audits and maintenance can improve organization, reduce delays, and help ensure the trolley remains safe, practical, and dependable.
Medivara Medical